|
Most folks haven't even
heard of a wire recorder..... much less ever seen a steel wire
recorder. Before the development of oxide based magnetic tape,
"glorified" steel piano wire was the dominant media of choice.
The technology of magnetic recording dates back to 1878, when
Oberlin Smith proposed the idea of recording telephone signals onto a
length of steel piano wire. Over the next thirty years the technology
evolved at a "snail's pace"; stalled by lack of adequate and
cost effective electronic amplification. By 1930, advances in electronics
allowed the first commercially successful wire recorders to be introduced
as dictating machines and telephone recorders in Europe and North America.
During WWII, the machines found their way into the BBC who employed banks
of them for sending messages to the French underground. Meanwhile the US
Army & Navy also employed them for similar purposes in their
operations centers. Following the war from 1947 to 1952, wire recorders
became popular in America and across Europe, and started showing up in
many homes. The wire recorder was the very first reliable audio recorder
to find it's way into the American home in significant numbers. In their
"Hay-Day", wire recorders were quite the item !
The advent of oxide based magnetic tape had many benefits over steel
wire.... Mainly the ability to record and playback in stereo. Thus
magnetic tape put an end to the wire recording era.
Signals recorded on steel wire recorders have held up quite well
over the years and the sound quality was fairly good considering the
limited technology of the day.
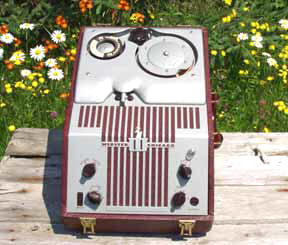
Depicted above is a Webster 80-1 which sold for around $150 back in
1947. Though early wire recorders used a DC bias which literally
"brute forced" the modulated audio current and subsequent flux
change onto the wire, the Webster's used a 40 kHz bias frequency for
greatly improved fidelity.

1878 - An American mechanical
engineer named Oberlin Smith proposes the idea of recording telephone
signals onto a steel wire. Though it never
went any further than just an idea, the concept of magnetic wire
recording was born.
1898 - Danish inventor
Valdemar Poulsen explores further the principle of magnetic recording.
The machine he developed was called the Telegraphone, and is described
as a device to record telephone messages in the absence of the called
party... in effect, the world's first answering machine.
1911 - Lee DeForest, then
working for the Federal Telegraph Company, is asked to develop an
amplifier to allow the recording of high-speed radio telegraph messages
received on a type of receiver called the tikker. Deforest
uses his Audion tube, invented in 1907, to make the first practical
electronic amplifier.
1918 - German inventor
Curt Stille modifies & improves on the Telegraphone by using
electronic amplification.
1939 - Marvin Camras at
The Armour Research Foundation invents an improved wire recorder. Several
thousand were sold to the American Army and Navy. Following the war,
licenses were sold to dozens of American and European manufacturers to
make wire recorders.
1946-47 - The first Amour
Research Foundation licensed wire recorders that appeared in America.
1947-52 - The consumer hay-day for wire recorders
which were then superceded by magnetic tape.
Audio fidelity of a wire recording is very limited
by today's standards, but still quite acceptable considering the
technology at the time. What's amazing is how well those early
recordings are holding up. Typical wire recorder spools hold
approximately 7200 ft of wire which allows approximately 1 hour of
play/record time.
A Wire Recording may be
transferred to almost any modern format such as a CD, DVD or even audio
cassette, though transfer to a CD is the most popular. Converting the
audio to WAV or MP3 computer files can also be done.
Although the wire
recordings are holding up remarkably well, the main concern in the not too
distant future, will be the ability to locate a still working machine.
This is yet another case where the media will out survive the hardware
upon which to play it.
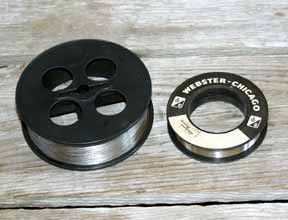
Up until 1946 or so, wire recorder spool
sizes weren't standardized. Armour®, early Pierce® and GE® machines
used a larger spool size than later to come machines, while some Army/Navy
recorders used even larger reels for the recording of intercepted enemy
transmissions during the War.
Most popular during this early period
was the 3 3/4" diameter Armour reels that were 1 1/4" thick as
depicted in the reel shown on the left. Later, when Armour licensed the
technology to companies such as Webster®, Silvertone® and others, a
smaller reel size was adopted as the new industry standard. The standard
reels measure 2 3/4" in diameter and were approximately 3/4"
thick as shown on the right. Each standard reel could hold up to 7200 ft
of wire, which at a 24 ips recording speed would yield up to an hour of
recorded material. Naturally the newer format machines would not
accommodate the older larger Armour reels. Also, the Armour wires were
recorded at approximately a 50% faster speed than the later to come
Websters. Unfortunately, unlike the Webster wires, the Armour wires were
not made from stainless steel, and corrosion is a common problem.
Though all our machines are of the
newer format, we can still recover these early Armour wires. By means of
a fabricated jig to mount the larger wire spool, playback and recovery
of the wire is possible. The correct speed is obtained in our
restoration software which allows playback of the audio file at the
proper speed. Not what may be considered a glamorous solution
warranting technical accolades of the highest order, but since these
early recorders are virtually extinct and parts are nearly impossible to
find, it's a solution that works extremely well ! Whether it's a
"clever" solution or not, remains a matter of debate....
The only drawback to this
"brilliant" solution, is that the wire bailers on the newer
machines were designed to bail the wire back on a 3/4" thick reel,
and not the 1 1/4" thick Armour spools. The only proper solution
would be a complete re-design of the bailer mechanism, necessitating the
fabrication of custom parts. Not impossible, but there's little
demand for these transfers, so it's yet another project around here that
remains still on the "back burner". As such, we have no viable
(or even clever way that's occurred to me so far) to rewind the wire
back on the original Armour spools (neatly and properly, anyways). Thus
these wires will have to be rewound on a newer size spool. Since the
newer spools hold less wire, most Armour wires may require 2 or 3
spools.
Sometimes in the world of vintage
transfers, one has to improvise !
Most steel wire was of reasonable
quality and had a high chromium content for inhibiting rust. Some wire
sold back then was of lesser quality or was stored in a damp environment
- even stainless steel is not totally rustproof.. Avoid playing any wire
that clearly shows signs of oxidation. The rough oxidized wire surface
will rapidly grind the head groove down.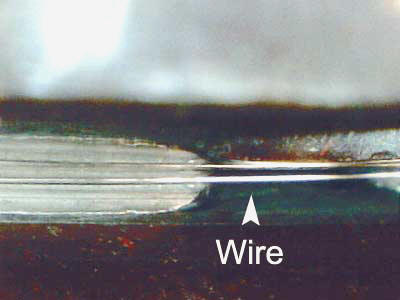
Light oxidation may be removed by
passing the wire several times over a 3M® "scrunge" pad -
lightly moistened in WD-40. This will remove the lightly oxidized layer
as well as provide lubrication for the transfer. Be sure to make
at least 3 cleaning passes using Pellon® or a lint free cloth to remove
the oxidation and crud as well as any excess WD-40. This will enable the
transfer to be made without destroying the record/playback head.
Though you will be tempted to try this on your working recorder, we
advise getting a "junker" with a bad head to merely serve as
the transport for this endeavor, lest your working recorder gets
"trashed" in the process. Moderate to severely oxidized wires
are often too far gone and you would be well advised not to attempt
playback unless you intend to scrap your precious recorder before
project completion.
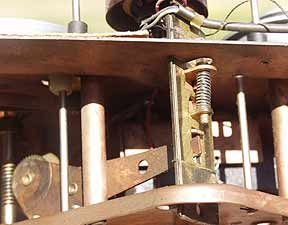
At the right is pictured the
recording head. The dark area to the right is the head gap where the
actual recording/playback takes place. The wire passing over the head
eventually will wear a deep groove in the head guide. The groove can get
so deep that the wire almost disappears and the "canyon" it
managed to carve out over time. The deeper the wear groove, the poorer
the recording quality, as the air gap spacing is critical. Also as a
deep groove is cut, there is a greater chance of a snag and wire
breakage. This head on one of our Webster's depicts very little wear.
The wire used in all wire recorders is
very thin..... just slightly larger than the diameter of a human hair !
Below to the right, is pictured the wire amongst my gray hairs taken at a
200x magnification. This explains how 7200 feet or so of wire can be made
to fit on a small 2 3/4" diameter reel.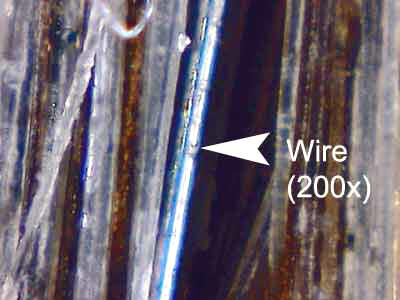
Wire tangles and breakage is a common
problem - especially on old reels not having been played or re-packed in
several decades, where splices tend to snag, or where the head tower
assembly "sticks", resulting in uneven wire packing.
Consequently, some of the snarls can be nothing short of
"hellacious"...... If you enjoy the challenge of solving
complex 3-dimensional puzzles working with hair thin kinky wire, then
untangling a snarled reel will be right up your alley ! Solving a Rubik's
Cube puzzle is child's play compared to the challenge & complexity of
untangling a badly snarled wire. The wire is quite thin and a pain to work
with - especially when having to splice the broken lengths back together.
Though not absolutely necessary, what works great for this are two similar
devices. The first is a fly fishing jig used to tie fly's. The
other is a jig commonly used in electronic assembly work for holding small
components to be soldered or for inspection. Radio Shack® sells a
neat little jig complete with magnifying glass for about $10 or so
(Catalog # 64-2063). On the Radio Shack jig, be sure to pad the alligator
clips with anything soft so the wire doesn't get bent or pinched.
Anyways, both devices will hold the unruly wire and reduce your
frustration levels ! A small pair of tweezers , needle nose pliers or just
nimble fingers are all that's now required to make the splice. A
less glamorous but cheaper solution is to just get some temporary
"sticky dot" labels from an office supply store. Use them to
tape down the unruly wire while you form the splicing knot.
Don't tie just any old knot -
otherwise it will more than likely snag in the head groove and break
again. (a picture of the correct splice follows below).. Worse yet,
is that the broken bits may fall into the electronics, wreaking havoc
& damaging the circuits. After making several splices, you'll develop
a technique and subsequent repairs should take but only a minute or two.
Audio fidelity is poor by modern
standards - There is poor base response with a sharp roll-off below 200
Hz. Hi frequency components are also non existent with very little
response above 5 to 6 KHz or so. Thus wire recordings were fine for
voice recording (typically most energy for the human voice falls in the
200 to 5 KHz range) but offered very limited fidelity for music.
A major contributor to the wire
recording's poor fidelity as compared to magnetic tape, was the poor
quality supplied crystal microphone that all wire recorders seemed to be
cursed with. Microphone technology of the late 40's was pretty crude -
some dynamics, but most were crystal mics, and quality wise, not much of
an improvement over a carbon pile made to vibrate by a stiff diaphragm
- at least for a consumer grade mic anyways. Thus the microphone
itself had poor frequency response suited only for voice reproduction. Mic
sensitivity was also poor and the mic had to be held close to the sound
source for best results. A wire recording made today with a good
quality low impedance microphone actually sounds pretty good and a direct
line level connection even better !....... not hi-fi by any stretch
of the imagination, but MUCH better than the supplied mic.
Another point worth noting, is that very
few of the wire recorders had accurate level meters - or more accurately,
ANY recording level meters. Most had a neon "magic eye" to
supposedly prevent setting too high a recording level. The "magic
eye" was a "somewhere in the ballpark" reference at best.
Most folks paid it no heed or didn't understand it's use anyways, and thus
recording levels tended to be all over the place.... being either
driven into clipping (as in children's screams) or recorded down "in
the mud". Even so, when recorded at anywhere's near the proper levels
with the mic in close proximity to the source, the recordings even after
50 years or more are perfectly intelligible. Compare that to early
magnetic tape...... most early magnetic tapes which by now have ended up
in a landfill due to oxide shedding.
On the plus side, wire recordings suffer
very few of the maladies associated with the degradation of magnetic tape.
Wire doesn't suffer from the fatal effects of hydrolysis, oxide shedding
and binder de-lamination as does magnetic tape. Though the wire is subject
to oxidation, most manufacturers added enough chromium to the steel to
minimize the effects. Like it's tape counterpart, it is subject to
slow erasure by long exposure to stray magnetic fields or repeated play in
a machine that needed demagnetizing. Even so, wire is less effected (note,
I didn't
say UN-affected) by stray fields as compared to magnetic tape however.
Based on our own observations, wire
recordings are already holding up amazingly much better than their
magnetic tape counterparts for the reasons just mentioned. Unlike tape
degradation that ultimately yields magnetic tapes unplayable, wire
recordings' largest enemy is corrosion of the wire due to improper
storage, or the wire having to be discarded after a bad snarl.
Though anything but "Hi-Fi", few will actually require audio
restoration if transferred from a machine maintained in good operating
condition.
Wire Recording Life Span Expectancy
Even though we feel that wire
recordings will last another 50 years or perhaps even longer based on
how they've held up so far, the main consideration here will be trying
to find someone with an old wire recorder still in good operating
condition in another 10 years or so to make the transfer. This is
another one of those cases where the media will outlive the availability
of the equipment on which to play it.
No other magnetic recording media to
date has so far matched or even come close to a wire recording's
longevity. It remains an impressive record that has yet to be
broken.......
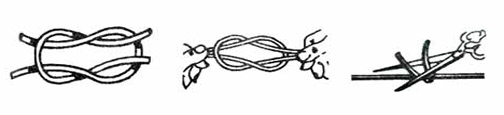
Use the following splice - if done
properly, it will not snag.
1. Tie the ends of the wires
together with a square knot.
2. Pull the knot tight.
3. Cut off the loose ends close to
the knot.
This splice will pull through the
groove of the recording head without catching.
It is recommended that 3 foot leaders of #8 sewing
thread be tied to both ends of the wire. The inside leader should be
permanently tied to the supply spool and greatly reduces the possibility
of wire breakage at the ends. A simple square knot is used to secure the
thread to the wire.

Like magnetic tape, avoid storing or
placing wire reels in close proximity to magnetic fields and store them in
a dry environment. Moisture and the subsequent resulting oxidation,
are both the recording wire as well as the recording machine's worst
enemy. Place several packets of silica gel desiccant in the case
before putting the recorder and reels away and store in a dry, temperature
controlled environment. Silica gel is commonly available in most craft
shops and some hardware stores.
Interested in acquiring one ? They often show up
on eBay, though you might have to wait awhile for one in good working
condition to turn up. Note: despite the overly optimistic claims
made of "working just fine", "As New !!!" or
being in "Mint" condition, nearly all are in need of repairs or
general maintenance of some sort. Experience dictates that unless
the seller is willing to give at least some sort of warranty, you're best
advised to "pass" or view it as a repairable or parts machine
only and bid accordingly.
We are often asked if we repair wire
recorders...... Though we perform our own repairs and servicing, our
services are limited to the transfer and recovery of vintage recordings.
For the repair and servicing of wire
recorders, you can contact:
West-Tech
Services: www.west-techservices.com
Most wire recording servicing can be performed yourself.
This is not an extensive dissertation on the repair or maintenance of a
wire recorder, but rather some simple things you can do to prolong it's
life... If you're not comfortable with such
endeavors, then it might be better to have a technician perform the tasks.
Yet, it's actually quite easy to do...... First, above all - UNPLUG
the unit before delving inside. All wire recorders are pretty much of the
same basic design, so the following will apply to almost anything out
there...
Ok, say you "lucked out" and found a working
one. To keep it working, it's going to require a little
TLC.....
Begin by removing the unit from it's case (surprisingly,
this is the most difficult part..... locating the the right screws !). On
most of the Websters, there are 4 brass Phillips head screws on the bottom
and one each on the left & right sides. Once out of the case, the rest
will be easy ! If you have access to an air gun, blow the dust and
years of accumulated crud off the electronic components and tubes. The
dust acts as an insulator and will cause overheating (Vacuum tubes
generate lots of heat !). Also closely inspect for pieces of broken
wire that managed to fall inside...... Small pieces of broken wire can
short out the circuits and result in severe damage depending on where they
land. (which is inevitably where they WILL land to wreak the most damage
for reasons not fully understood).... Again, an air gun works great
for locating and dislodging wire bits, loose screws and other accumulated
"junk".... Cleaning out the inside of some cases,
often more resembles an "archaeological dig" than it does a
simple cleaning. Small pieces of broken wire falling into the mechanism
(usually the result of snarls and sloppy splicing techniques) is a common
problem and the cause for many wire recorder "early
retirements".
Do not touch the glass tubes with your fingers. If you
do, be sure to wipe the oily residue off, as the oils present in your skin
will cause early tube failure !
Wire Snarls
So endemic is this
problem to wire recorders, I've decided to include
a section specifically addressing this topic.
TIPS:
Before even threading any wire for
playback, first insure that the machine is working correctly -
especially the bailer. Place the machine in play (you don't even need a
wire mounted) and note the head/bailer smoothly moving up and down over
it's FULL range. On most machines, the bailer is driven by the take-up
reel and you needn't even have a wire threaded up to check for proper
operation. You can lightly
press down on the head to check for it's full range of travel. It should
not bind or get stuck in ANY position. This simple check for
proper bailer operation will save many many hours of untold grief or
sadly having to discard a badly snarled wire, which is almost always
absolutely guaranteed if the bailer mechanism is not functioning
perfectly. I cannot overstress enough the importance of proper bailer
operation.....
Check take-up reel
tension. It should be within specification. Either a tensiometer
or torque gauge is required for this, and is best done by a service
technician who has such an instrument and is familiar with wire
recorders. Too much or too little tension or back-tension on the
take-up reel, will result in upper wraps being literally pulled under
lower wraps - even with a properly operating bailer. Without a
tensiometer or torque gauge, setting the proper back tension is
impossible, but here is some "rules of thumb" . As the
reel rotates, the tension should not vary. Also the proper tension is
just that amount that ensures proper packing of the reel without having
loosely wrapped wire. The proper wire tension is maintained
basically by a clutch allowing controlled slippage. Most machines use a
felt pad for the clutch which often becomes glazed with crud over the
years. The felt pad can often be reclaimed by lightly abrading off the
glaze with some medium grit sand paper. Most Websters have a spring type
of adjustment that allows setting the proper pressure applied to the
felt clutch pad.
If a wire snarls on
playback, stop playback immediately and deal with the tangle before
matters become much worse - as they most assuredly will.
NEVER try and brute force
out a snarl by pulling and "hoping for the best". It rarely
works and almost always results in your pulling upper wraps under
overlying ones, or cinching the snag even tighter, making what started
off as a simple problem, now a much more involved one. Trying to tug out
a snarl will almost always kink the wire and the kink will then have to
be cut out - though sometimes a loose kink can be carefully unbent and
run between your fingers to smooth it out if not kinked too tight. (Be
sure to wear white gloves or remove skin acids and oils from the wire
after doing this).
If you are forced to wind
a wire by hand (not recommended), make certain it is tightly packed
throughout. Loosely packed wires will immediately snarl on playback, and
days of effort may all be for naught.
  Many
if not most wire snarls are machine induced. A properly maintained wire
recorder will rarely if ever, snarl a wire that is not corroded,
previously kinked or too loosely packed to begin with. Almost all wire
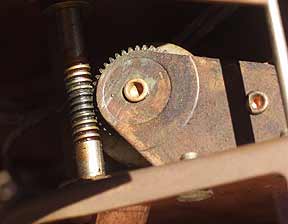
recorders use a cam assembly for raising and lowering the head tower
(called bailing) thus distributing the wire evenly on the take-up or
supply spools. The head tower bailer assembly is usually driven by the
take-up reel drive mechanism. In just about all machines, the head tower
is "powered" up by the cam, but gravity is the sole mechanism
that allows the head to lower thus following the cam, as the small
diameter of the cam rotates into position. After 45
years or so, the unit is in dire need of lubrication - you can absolutely
count on it ! The first to jam due to dried grease is the all important
head bailer. The head/bailer slides up and down in a guide and must be
lightly greased, as well as the worm gearing and cam assembly.
Before applying new grease, the old dry grease must first be removed. Use
"PB Blaster", which is a penetrating solvent available at
any half decent auto parts store. Spray some on a Q-tip and have at it
(NEVER spray directly in the mechanism) ..... Re-lube with a light
lithium based grease. A drop of machine oil (or even motor oil if you
don't have machine oil) on both ends of the motor shaft should also be
done. Many
if not most wire snarls are machine induced. A properly maintained wire
recorder will rarely if ever, snarl a wire that is not corroded,
previously kinked or too loosely packed to begin with. Almost all wire
recorders use a cam assembly for raising and lowering the head tower
(called bailing) thus distributing the wire evenly on the take-up or
supply spools. The head tower bailer assembly is usually driven by the
take-up reel drive mechanism. In just about all machines, the head tower
is "powered" up by the cam, but gravity is the sole mechanism
that allows the head to lower thus following the cam, as the small
diameter of the cam rotates into position. After 45
years or so, the unit is in dire need of lubrication - you can absolutely
count on it ! The first to jam due to dried grease is the all important
head bailer. The head/bailer slides up and down in a guide and must be
lightly greased, as well as the worm gearing and cam assembly.
Before applying new grease, the old dry grease must first be removed. Use
"PB Blaster", which is a penetrating solvent available at
any half decent auto parts store. Spray some on a Q-tip and have at it
(NEVER spray directly in the mechanism) ..... Re-lube with a light
lithium based grease. A drop of machine oil (or even motor oil if you
don't have machine oil) on both ends of the motor shaft should also be
done.
As stated before. dried
grease or lack of lubrication is a common problem that results in the head
tower not falling freely, causing the wire to be packed wrap upon wrap
atop of one another. The uneven packing due to the failed bailer, results
in upper wraps being pulled under lower wraps - especially if the wire
tension is not within specification due to grime on the clutch assembly,
corrosion on the supply shaft or a glazed felt clutch pad. When this
happens, there will be hundreds of snarls created - - the end result being
that the wire will have to be discarded and not worth the effort to try
and untangle and splice back together. For those brave folks with LO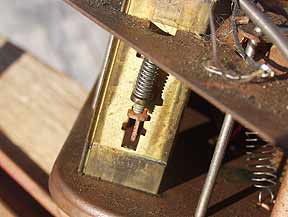 TS
of spare time on t TS
of spare time on t heir
hands or where the tangled wire is priceless and must be recovered at ANY
cost, here is the procedure....... heir
hands or where the tangled wire is priceless and must be recovered at ANY
cost, here is the procedure.......
Beware that attempting to
untangle such messes will likely involve literally 100's of hours on some
tangles. Begin by cutting out the kinks, and splicing the undamaged
sections back together. Don't worry that some spliced sections may
be out of order if the tangles are numerous and you can't follow the
sequence..... Get it untangled and spliced back together first to
make the transfer. The out of sequence sections are best put back in their
proper order by audio editing software rather than messing around more
with the unruly wire. Tools required for this frustrating endeavor are a
pair of sharp scissors, a common pin for following/tracing the nightmares,
tiny needle nose pliers, magnifying glasses , Scotch Tape or orange label
dots for temporarily securing segments, several bottles of Tylenol
and optionally (though highly recommended), a LARGE bottle of rum.......
(for medicinal purposes only). Kinks that have formed loops must be
cut out - do NOT attempt to splice together segments containing kinks or
another unbelievable snarl worse than the current one (if you can even
begin to possibly imagine it) will soon ensue.
Take-Up Reel Snarls:
Should the wire get snarled on the take- up reel, avoid at all costs the
temptation to remove the screws holding the top cover to free the snarl -
BIG MISTAKE !!! ..... Once "sprung" free, the resulting
tangle will almost always result in the wire having to be discarded, or
literally 100's of hours spent untangling the unbelievable mess..
Take-up reel snarls are ALMOST ALWAYS caused by a faulty bailer, improper
back tension or the wire being too loosely packed sometime back in the
wires' deep past.
Supply Reels Snarls: Luckily,
there is no cover to remove on the supply reel so the potential of making
matters much worse is eliminated. The best procedure to use on a snarled
reel, is to first cut the wire with a pair of scissors, then push the
bitter (cut) end to reveal the loop, and pull the bitter (cut) end through
from under the overlying wraps. A sewing needle will come in handy for
probing and freeing any kink. Again, never tug a snarl, or it will
cinch up tight and make tracing it much more difficult. After
untangling 6 feet or so, splice that section back on the take-up reel.
When hand wrapping wire on the take-up reel, make sure it is packed
tightly, as loose wraps are almost guaranteed to snarl again. Once
free, wind slowly by hand for about 10 feet or so to make certain there is
not a second snag close by, as is often the case.
Sadly, there is no magic trick to
removing bad snarls other that the tips related above. The procedure is
time consuming and often frustrating (unless you enjoy the challenge of
solving 3 dimensional puzzles such as a Rubik's Cube). Some or many
sections of badly kinked wire will unfortunately be unsalvageable. Keeping
the machine well maintained in addition to having the recording
transferred to an audio CD, is strongly advised. Even after having the
wire recording transferred, please hold on to and preserve the original
wire recording - even if it's still a snarled mess. Some unwitting soul in
the future or someone who just lives solely for the thrill of self abuse,
may take on the challenge !
Unlike magnetic tape, wire recordings
are holding up much better over the decades than their magnetic tape
counterparts. Please preserve the original recording...... As much of the
original material as possible should be preserved on that medium for the
future.
Wire Recorder Fast Forward Function ?
None of the wire recorders produced by any of the
manufacturers have a fast forward function to allow a quick preview
of the reel contents. It was not an important feature that was left
out by any of the manufacturers by simple oversight or for economic
reasons to keep prices low (even their top of the line machines did not
have a fast forward), but rather to avoid fast shuttling of any wire
coming off the small spool. The steel wire wants to stay
"coiled" and any wire pinching needs a millisecond or so to pull
itself out "gracefully" without snarling. Thus the high
resulting rpm of the supply reel in a fast forward, would result in
many a snarl, and thus the reason why none of the wire recorders had a
fast forward function.
To get around the problem on high speed rewind, you'll
note that all wire recorders regardless of make or model, have a much
larger take-up reel..... It's not a coincidence ! The over-sized
take-up reel upon which the wire is now being supplied on a rewind,
rotates much slower. Even with a large take-up reel, most wire
recorders by design aren't "blazingly" fast on a
"high" speed rewind, as they all average between 6 to 8 minutes
to rewind a full spool. Some of the early Pierce's used the same size
reels for both the supply as well as the take-up, but those machines
didn't have what could even remotely be considered a high speed rewind.
Now you know !
Dirt & grime inevitably will accumulate in the head
groove, causing the wire to "stick", resulting in a wow or
"spotty" playback. The head groove can be cleaned with Xylol
(available at almost any hardware store in the paint section). Use a
folded cloth or a small stiff tooth brush soaked in the mentioned solvent
to remove the sticky grime. Be careful just to clean the groove and not go
deeply into the head gap, otherwise potential damage to the head windings
may result. Isopropyl Alcohol can also be used to clean the brake pads and
idler wheels. Use only 99% pure medical grade IPA, as the standard off the
shelf supermarket variety contains only 60% - the remaining 40% being
mostly water. Note that Xylol should not be used on any rubber parts or
felt pads, as it is an extremely effective solvent that will not only
quickly dissolve the grime, but will also dissolve the rubber parts, as
well as the adhesive holding the felt pads in place.
Over a period of time, the mechanism will become
magnetized, which is a normally occurring process. Thus, every 10 hours of
use or so, the unit should be demagnetized for the best fidelity. This
includes the heads as well as any metal surfaces which the wire comes in
contact or in close proximity to. If not demagnetized, any wire
being played will be slowly erased by the magnetic field of the surface
over which it passes. Also, audio fidelity will suffer and noise levels
will increase should the head become magnetized.
If your demagnetizer is equipped with an on/off switch,
be sure to turn it on before bringing the probes close to the surface to
be demagnetized. Keep the power on while demagnetizing, and then SLOWLY
pull the probes away from the machine before switching it off. Avoid
turning the demagnetizer on or off when the probes are close, as the
sudden power surge and resulting spike of magnetic flux generated will
actually magnetize anything in close proximity. Thus with the
demagnetizer power on, SLOWLY bring the probes close to the surface and
then SLOWLY pull the probes away before turning off the power. Avoid
contacting the surface to be demagnetized..... Bring the probes
close, but avoid direct contact !
Demagnetizers can be purchased at your local Radio Shack®
or any half decent electronic supply. Look for the type with two probes to
get into tight places. A handheld bulk type demagnetizer can be used
on larger areas such as the take-up reel.
Electronics
Though far from an in depth
discussion or service manual type dissertation, here are some tips as
applicable to the vacuum tube electronics....
(Note: Vacuum tubes are
referred to as "Valves" in the United Kingdom) - though
techs sometimes refer to them as "Glow Bottles" or "Ether
State Devices"
Vacuum tubes operate at
much higher and potentially lethal voltages than those encountered in
transistor circuits. Unless you are experienced in troubleshooting such
devices, it is strongly suggested you leave such endeavors up to a trained
technician familiar with vacuum tube circuits. (Note: These techs are
usually easy to spot, owing to their grey or white hair.)
Wire recorders have the
simplest of electronics....... A simple filtered unregulated bulk
power supply, playback & recording amps (shared) as well as a bias
frequency r-c oscillator circuit. There's not much to them. Despite
their simplicity, the electronics have two inherent weaknesses.....
the vacuum tubes and the capacitors.
The Webster Model 180 for example, used a
6X5 full wave rectifier tube - 6SN7 twin triode output amplifier operating
in a "push/Pull" configuration - 2 - 6SC7's twin triode
Pre-amplifiers - and a 6V6 pentode beam power tube for the bias
oscillator.
Replacement tubes are available from many sources on the
net and are almost to be considered normal maintenance items owing to
their limited life span as compared to transistors. You can even special
order most of them through your local Radio Shack® store.
Thirty years past or so, most electronic stores (Radio Shack's & even
the local drugstore) had tube testers on their premises - most of which
you could use yourself. Today, those testers are all but gone with the
advent of the silicon transistor and integrated circuits. So how do you
identify a bad tube without a tube tester ? Sadly, other than the
obvious physical damage, you don't. Luckily, most wire recorders had only
5 tubes, and without a tester or an oscilloscope, you will simply have to
"shotgun" them all.
Aside from the tubes, an all too common electronic
problem are the old dried out wax/paper capacitors. They are notorious for
failing, and should the power supply rectifier caps start to go, you'll
get a nice LOUD 60 cycle hum and probably not much else. For less than $20
and several hours of scrounging around for parts, substitutions and
soldering, just replace all of them while you're at it. When substituting
capacitors, make certain the working voltage is either the same or greater
than the original - NEVER less. If replacing with electrolytic's, be
certain to observe proper polarity.
A slight hum with low audio output is also a sign of a
partially failed power supply filter capacitor. The B+ plate voltage
(the output out of the 6X5 in the case of the Webster 180) must be clean
dc voltage, lest nothing will work right.
Another thing to check that frequently causes problems,
is the two section record/play switch. The wipers often become "crudded
up" and may require cleaning (TV tuner cleaner works best -
also available at your local Radio Shack). Also check for broken wipers
that sometimes break or make poor contact due to metal fatigue after many
years of use. Since the wire recorder electronics shares almost all the
amplifiers for the playback as well as the record functions, a simple
broken/dirty selector switch (depending on which pole is faulty) can often
render the entire unit non functional.
A little TLC is all that's really needed to keep these
great old machines running. They were built like tanks and almost
everything was "over-killed" - all they often need is a little
cleaning and some lubrication.
So how does a vintage audio wire
recording actually sound you ask ?..... This clip is typical of a wire
recording in just average condition. These MP3's are raw captures
and no restoration has been applied.
The recording is an historical excerpt from a commentary
criticizing President Truman and the Wage Stabilization Board.
April, 1952 - (Amazing what will turn up on some of these
old wire reels !)
Short 10 second Clip :
File size: 157K Click
Here to Listen....... 1
Repairing and maintaining vintage
equipment isn't everyone's "cup of tea" however.
For professional quality transfers
to CD, MD, Tape or other formats, just give us a call.
Last Modified: Sept 8,
2004

Copyright © 2003, 2004
Video Interchange
92 George Luce Rd
Waldoboro, ME - Maine 04572
207-832-5064
Northeast Region - New
England
http://www.videointerchange.com/ |